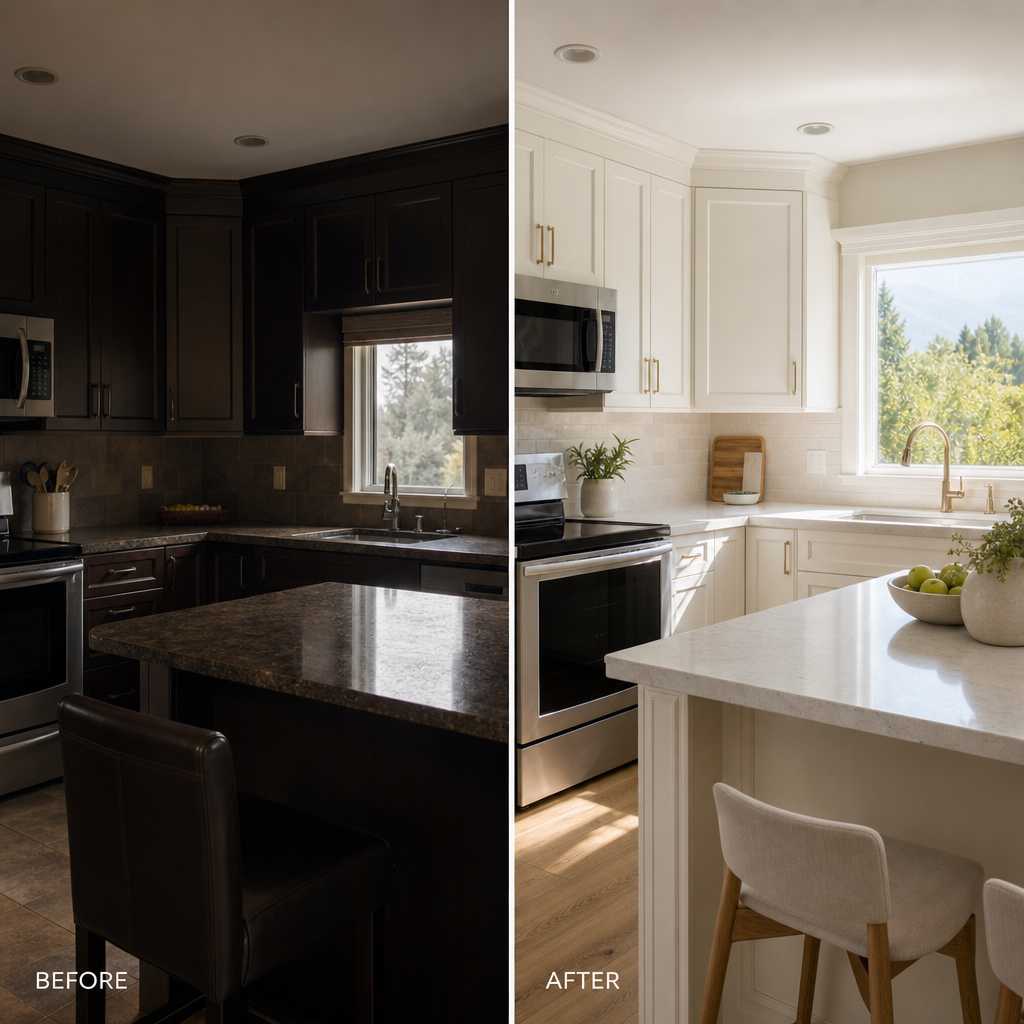
Most homeowners in Abbotsford, Langley, and Surrey underestimate how dramatically dark cabinetry shrinks a kitchen. A room that feels closed-in and dated can open up completely with a single colour change, and it costs a fraction of a full cabinet replacement. The demand for dark cabinet to light painting has surged across the Fraser Valley as homeowners realize refinishing delivers professional results without a full renovation budget. Dreamscape Painting Ltd. has been executing these transformations for over 35 years, and the process is more technical than most people expect.
Table of Contents
- Quick Takeaways
- Why Dark to Light Is Harder Than It Looks
- The Dreamscape Process for Cabinet Refinishing
- Choosing the Right Light Colour for Fraser Valley Homes
- Comparing Your Options: Refinishing vs. Repainting vs. Replacement
- Common Mistakes Homeowners Make with Cabinet Colour Changes
- What Kitchen Cabinet Colour Change Costs in the Lower Mainland
- Frequently Asked Questions
- References
Quick Takeaways
| Key Insight | Explanation |
|---|---|
| Dark pigments bleed through light topcoats without proper blocking | A shellac-based or oil-based primer is required to seal dark tannins and prevent discolouration within weeks of painting. |
| Surface prep determines 80% of the final result | Degreasing, sanding, and filling grain before priming is what separates a professional finish from a peeling DIY job. |
| Cabinet doors should be removed and sprayed flat | Spraying horizontally eliminates sag lines and brush marks that ruin a fine finish on highly visible door faces. |
| Fraser Valley homes benefit from warm whites over stark whites | Natural light in the Lower Mainland tends to be cooler and overcast. Warm whites like Benjamin Moore White Dove read as bright without feeling clinical. |
| Two finish coats minimum are required on dark substrates | Single-coat coverage over dark colours is always insufficient. Two to three coats of finish product ensure full opacity and durability. |
| Cabinet refinishing costs 60 to 80 percent less than replacement | A full cabinet replacement in the Lower Mainland averages $15,000 to $30,000. Professional refinishing typically ranges from $2,500 to $6,000 for a full kitchen. |
| Proper ventilation during application protects both workers and finishes | Solvent-based products used in fine finish cabinet work require controlled airflow to cure correctly and safely in a residential kitchen setting. |
Why Dark to Light Is Harder Than It Looks
A dark cabinet to light painting project is one of the most technically demanding refinishing jobs a residential painter can take on. The core challenge is bleed-through. Dark stains, dark oil-based paints, and wood tannins in species like oak or cherry will migrate through a water-based topcoat if the substrate is not properly sealed. You can apply three coats of premium white paint and still see yellow or grey discolouration within 30 days if the primer stage is skipped or done incorrectly.
In practice, Dreamscape Painting uses a shellac-based primer on the most stubborn dark substrates because it is the single most reliable bleed blocker available. Oil-based primers are a strong second option. Water-based primers, regardless of what the label claims, are rarely sufficient on dark-stained cabinetry in our experience across hundreds of kitchen projects from Abbotsford to Burnaby.


The other complication is adhesion. Cabinet surfaces are typically coated with lacquer, conversion varnish, or catalyzed finishes. These are designed to be durable, which means standard latex primer will not bond to them without mechanical abrasion. Every cabinet surface that Dreamscape prepares is hand-sanded or scuff-sanded with a random orbital sander before any primer is applied. This is non-negotiable.
Pro tip: If a painter quotes your cabinet refinishing project without mentioning primer type or surface prep steps, that is a serious warning sign. Ask specifically which primer they plan to use on dark substrates and why.
The Dreamscape Process for Cabinet Refinishing
After 35 years of fine finish work across the Lower Mainland, Dreamscape Painting has developed a cabinet refinishing process built around one principle: every step that gets skipped shows up in the final product. The process is linear and non-negotiable.
Step 1: Full Degreasing and Hardware Removal
Kitchen cabinet surfaces accumulate grease, cooking oils, and cleaning product residue over years of use. Before any sanding happens, all surfaces are cleaned with a degreaser that breaks down oil contamination. Hardware, hinges, and doors are removed. Drawer fronts come off the boxes. Every component is treated as an individual panel.
Step 2: Sanding and Grain Filling
Open-grain woods like oak present a specific problem for a light finish. The grain telegraphs through the paint as visible texture lines, which looks unprofessional on a smooth white cabinet. Dreamscape fills and sands the grain flat before priming on open-grain species. This adds time to the project and some painters skip it entirely to save cost. The difference in the final surface is immediately visible.
Step 3: Blocking Primer Application
The appropriate blocking primer is applied by spray to all cabinet boxes and flat-laid doors. Spray application ensures an even film build without brush marks. The primer is allowed to cure fully before any topcoat work begins.
Step 4: Topcoat Application in Controlled Conditions
Cabinet doors are sprayed flat. Cabinet boxes are sprayed in place with masking protecting countertops, appliances, and surrounding walls. Dreamscape uses commercial-grade waterborne alkyd or catalyzed acrylic products for cabinet topcoats. These products cure to a harder, more durable film than standard interior wall paints, which matters enormously on surfaces that get touched dozens of times each day.
Pro tip: Ask your painting contractor what product they use for cabinet topcoats. If the answer is standard interior latex paint, the finish will not hold up to daily kitchen use. A proper cabinet finish product has a significantly higher hardness rating and chemical resistance than wall paint.
Choosing the Right Light Colour for Fraser Valley Homes
The Fraser Valley and Lower Mainland sit in one of the cloudiest climates in Canada. This matters for colour selection. Stark, cool whites that look clean and modern in a sun-drenched California showroom can read as cold and grey in a Langley kitchen under overcast skies. The data consistently shows that warm whites and off-whites outperform pure whites in client satisfaction surveys for this region.
“Light reflectance value alone does not predict whether a white will feel warm or cold in a space. Undertone matters as much as brightness, especially in low-natural-light environments.” – Benjamin Moore Colour Team, published guidance for regional colour selection
Specific colours that perform consistently well in kitchen cabinet colour change projects across the Lower Mainland include Benjamin Moore White Dove (OC-17), Benjamin Moore Chantilly Lace (OC-65) for clients who want maximum brightness without coolness, and Sherwin-Williams Alabaster (SW 7008). These are not arbitrary picks. These are colours that Dreamscape estimators recommend based on observed results in actual Fraser Valley homes.
Greige and light warm grey cabinets are also a strong transitional option for homeowners who want to move away from dark espresso or dark walnut finishes without going fully white. Colours like Benjamin Moore Pale Oak (OC-20) work exceptionally well when the goal is a bright, updated kitchen without the commitment of bright white.

Comparing Your Options: Refinishing vs. Repainting vs. Replacement
Homeowners in Abbotsford, Surrey, and Langley frequently come to Dreamscape Painting unsure of which approach makes sense for their specific situation. The answer depends on cabinet condition, budget, and desired finish quality. Here is a direct comparison of the three main approaches.
| Approach | What It Involves | Best For |
|---|---|---|
| Professional Cabinet Refinishing | Full prep including degreasing, sanding, grain filling, blocking primer, and 2-3 coats of commercial-grade topcoat applied by spray. Doors removed and laid flat. | Homeowners who want a durable, factory-quality finish. Best value option for structurally sound cabinets changing from dark to light colours. |
| Basic Cabinet Repainting | Cleaning, light sanding, primer, and brush or roller application of interior paint. Doors typically painted in place. | Tight budgets or cabinets already in a light colour that need refreshing. Not recommended for dark to light colour changes due to bleed-through risk. |
| Cabinet Replacement | Full removal of existing cabinets and installation of new cabinetry. Requires countertop work, plumbing disconnection, and often tile or flooring repair. | Cabinets that are structurally damaged, warped, or where a full layout change is needed. Cost is 5 to 10 times higher than refinishing. |
The honest answer for most Fraser Valley homeowners with structurally sound dark cabinets is that professional refinishing delivers 90% of the visual impact of replacement at 15 to 25% of the cost. The cabinet boxes and door profiles stay the same, but the colour transformation is dramatic enough that most guests assume the kitchen has been fully renovated.
Common Mistakes Homeowners Make with Cabinet Colour Changes
After completing hundreds of cabinet refinishing projects across the Fraser Valley and Lower Mainland, Dreamscape Painting estimators see the same mistakes repeatedly. These errors are almost always more expensive to fix after the fact than they would have been to prevent.
Using the Wrong Primer
A common mistake is reaching for a water-based primer because it is low odour and easy to clean up. On dark cabinets, this choice almost guarantees bleed-through discolouration. The slightly higher cost and ventilation requirements of a shellac-based blocking primer are not optional on this type of project.
Skipping the Cure Time Between Coats
Cabinet finishes need adequate cure time between coats to bond correctly. Rushing the process by recoating too early results in soft finishes that scratch, chip, and peel prematurely. In cooler Fraser Valley temperatures, cure times can extend beyond what the product label suggests for warmer climates.
Painting Doors Vertically
Painting cabinet doors while they are still hung on the cabinet box is one of the most reliable ways to end up with sag lines and uneven coverage on the most visible surfaces in the kitchen. Removing doors and spraying them flat is the only method that produces a finish quality comparable to factory cabinetry.
Choosing a Colour in the Store Rather Than on the Actual Cabinet
Paint chips in a fluorescent-lit hardware store bear little relationship to how a colour reads on real cabinet surfaces in your specific kitchen. Dreamscape estimators strongly recommend testing at least two to three colour samples directly on cabinet doors before committing to a full project colour.
What Kitchen Cabinet Colour Change Costs in the Lower Mainland
Pricing for cabinet refinishing in the Fraser Valley and Lower Mainland varies based on kitchen size, cabinet construction material, current colour, and the finish product specified. The following ranges reflect what Dreamscape Painting sees in real project estimates across Abbotsford, Langley, Surrey, and surrounding communities.
A standard kitchen with 30 to 40 cabinet doors and drawer fronts, requiring a full dark to light colour change with proper blocking primer and two coats of commercial topcoat, typically falls in the $3,000 to $5,500 range. Larger kitchens with additional cabinetry or open-grain wood requiring grain filling will sit toward the higher end or above it. Smaller kitchens or projects without significant dark-to-light challenges can come in below $3,000.
According to Statista data on Canadian home renovation spending, kitchen updates consistently rank among the highest-return renovation categories for resale value. Cabinet colour changes specifically are cited in multiple North American real estate studies as one of the fastest visual improvements buyers notice in listing photos. The investment in professional refinishing pays returns that basic DIY repainting cannot match because the quality difference is visible in photographs.
One number worth understanding: full cabinet replacement in Metro Vancouver and the Fraser Valley typically costs between $15,000 and $40,000 depending on materials and scope. Professional refinishing delivers a comparable visual transformation at roughly 15 to 20 cents on the dollar compared to that figure.
Frequently Asked Questions
How long does a dark to light cabinet refinishing project take?
Most full kitchen cabinet refinishing projects completed by Dreamscape Painting take two to four days on-site, depending on kitchen size and the number of cabinet doors. The cure time after the final coat means cabinets should be treated gently for five to seven days post-completion, with full hardness reached at 30 days.
Will light-painted cabinets show dirt and grease more easily than dark ones?
Light cabinets do show fingerprints and grease more readily than dark ones, which is a real tradeoff worth knowing. However, a quality cabinet finish product cleans much more easily than a standard wall paint. Clients who invest in a commercial-grade waterborne alkyd or catalyzed finish report that routine wiping keeps the cabinets looking clean without effort.
Can any dark cabinet be painted light, or are there situations where it is not recommended?
Cabinets with significant structural damage, delaminating veneer, or swollen particleboard from water damage are not good candidates for refinishing. The substrate needs to be stable and solid. Dreamscape estimators assess cabinet condition during every in-home estimate and will give an honest recommendation if replacement is the more practical option for a specific set of cabinets.
How does Dreamscape Painting handle the mess and disruption in the kitchen during a cabinet project?
Dreamscape Painting has been known for cleanliness and minimal disruption for over 35 years. During cabinet refinishing, all countertops, appliances, floors, and adjacent rooms are masked and protected before any work begins. The kitchen is typically accessible for limited use in the evenings when crews are off-site, and all overspray and dust is contained to the working area.
Is cabinet refinishing a good idea before selling a home in the Fraser Valley?
It is one of the highest-return pre-sale renovations available in this market. Dark kitchen cabinets are consistently cited by real estate agents in Abbotsford, Langley, and Surrey as a feature that reduces perceived value in listing photos. Updating them to a current light or neutral colour before listing typically costs under $5,000 and can meaningfully improve offer quality and speed of sale.
What paint products does Dreamscape use for cabinet topcoats?
Dreamscape Painting specifies commercial-grade waterborne alkyd or catalyzed acrylic products for cabinet finish work, not standard interior latex paint. These products are formulated specifically for high-touch surfaces and cure to a significantly harder, more washable film. Specific product selection depends on the substrate and client preference for sheen level, typically satin or semi-gloss for kitchen cabinetry.
If you have gone through a dark to light cabinet refinishing project in the Fraser Valley or Lower Mainland, share what the biggest surprise was in the process or how the finished result changed the feel of your kitchen.
We would love your feedback and any insights you would share with others. What perspective would you add?
References
- Statista: Home renovation spending trends and kitchen update return on investment data
- Forbes: Home improvement projects with the highest resale value returns for homeowners
- U.S. Environmental Protection Agency: Guidelines on ventilation and indoor air quality during residential painting projects
- National Research Council Canada: Building materials performance standards and paint product durability research
- Canada Mortgage and Housing Corporation: Research on renovation impacts on Canadian residential property values